Lego Router (WRT54GL)
********
Update 4/02/2022: I’ve moved my blog to a new website. This post can now be found at https://www.unterminated.com/projects/lego-router
********
So, I got the urge to build something again. As I looked around my room, I noticed the five Linksys WRT54GL routers I had bought from Amazon.com when they were on sale. Of course I immediately thought, “I wonder if that would fit nicely in a Lego case?”. So I opened one up and measured the circuit board. It looked like it would be a good fit, so I decided to go ahead and design a case for it. This is the result.
 My goal was to recreate, as much as possible, the stackable design of the original WRT54GL case while maintaining full functionality of the router (buttons, LEDs, ports). I also wanted to keep some air flowing through the case to avoid overheating the board.
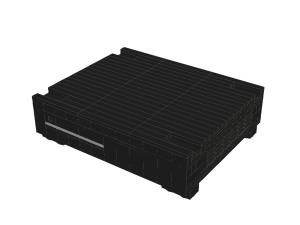 The first step was to take detailed measurements of the WRT54GL PCB. It turns out that the board is exactly 160mm x 144mm, which means that it fits perfectly within the dimensions of Lego bricks (which are multiples of 8mm).
Over the course of the next two days, I drew the design using MLCAD. I kept with the style of my previous Lego computer: a sleek exterior, smooth top, and subtle air vents.
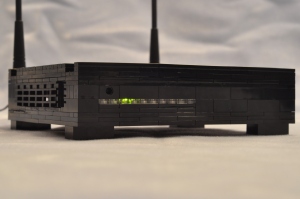
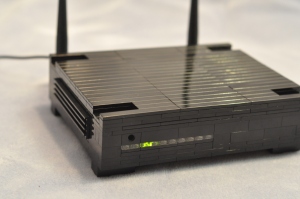
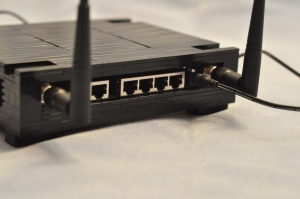 The design I finally decided on has two air vents (one on each side), a row of clear bricks for the LEDs to shine though, a hole for the front button, and an opening for the ports in the back. The PCB is secure in the case, so there is no trouble with it moving around when you connect/disconnect cables.
After I was happy with the design, I exported it to BrickLink to find a seller who had all the parts I needed. My order came to about $50, but I added some extra “just-in-case” parts which bumped the total to $60. (Twenty dollars more than I paid for the router itself!)
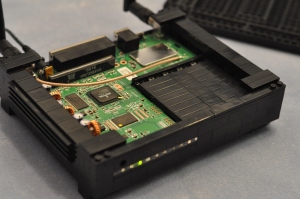 The PCB for the WRT54GL is an “L” shape, which presented an interesting challenge. The small side of the “L” is just shy of 61mm, which is 3mm short of being a multiple of 8mm. Initially, I thought I would have to leave a big gap, or just design a square inset.
However, Lego plates are 3.2mm tall. I took advantage of this by using hinge pieces to rotate the orientation of the bricks by 90 degrees, and using a flat tile as a spacer. This brought the width of the inset to be exactly the size of the PCB by filling in that extra 3mm.
I also learned from my previous mistake, and lined the top of the case primarily with flat tiles. The top is secured by only four small plates, one in each corner, which makes it much easier to remove without having to dismantle the whole thing.
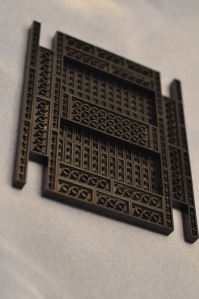 Aside from assuring the board fit snugly in the case, I also took into account ventilation. The back and two sides of the case are open, allowing air to flow through. Additionally, the top to the case is thin to reduce the potential insulating effects of the Lego bricks.
Lego bricks are actually manufactured to be slightly smaller than 8mm to allow them to sit nicely against each other when connected. I took advantage of this fact by making a large section of the top only one tile thick, which leaves gaps through which hot air can escape from the case.
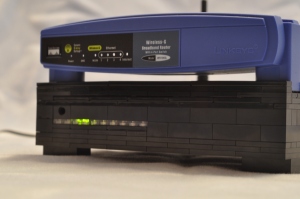 The lid also makes the case stackable with itself, although, unfortunately not with the original WRT54GL. Left to right, and width-wise, the feet of the original case fit great, but they are not spaced a multiple of 8mm from front to back, so they could not line up with my design. I can pretend though 🙂
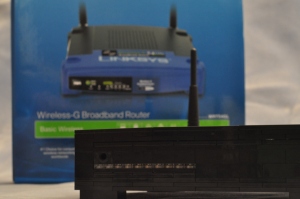 Only two problems came up as I was constructing the case, and both were relatively minor.
First, the top pieces were not high enough to go over the antenna connectors. Somehow I measured wrong and omitted one layer of plates. Luckily, I bought enough extras to fix the mistake.
After I resolved that, the antennas wouldn’t screw on because they were too big to reach the connectors. As it turns out, the wide plastic piece at the base of the stock antennas is removable! Popping it off exposes the TNC connector (in the same style as the high-gain HGA7T antennas) and allows the antennas to attach without issue.
Ultimately, I am very pleased with how this project turned out and I hope you enjoyed reading about it. If you’d like to try making a case for your own WRT54GL, I’ve packaged all of the design documents and images and released them under the by-nc-sa Creative Commons license. You can choose the small download (155 KB), which contains only the documents and part lists, or the full download (5.5 MB), which contains all of the assembly images as well. Check out the included README.html for details.
Oh, and here is the obligatory time lapse video…
Thanks for reading!

[…] 1 votes vote <b>Lego</b> Router (WRT54GL) « Luke's Weblog Of course I immediately thought, “I wonder if that would fit nicely in a Lego case?”. […]
<b>Lego</b> Router (WRT54GL) « Luke's Weblog said this on January 9, 2010 at 5:23 am
Hello have you a instructions over the lego models
Instructions: lego coputer and router
Anonymous said this on September 4, 2010 at 4:35 am
Awesome! Thanks for sharing
Wardo said this on January 12, 2010 at 2:05 pm
i like your design better than theirs
Drunk Munki said this on January 12, 2010 at 7:47 pm
[…] at [Luke's] LEGO router case; STARE AT IT! The router is nothing special, a WRT54GL that is fun to hack. We’ve seen it […]
LEGO router case bests factory finish - Hack a Day said this on January 13, 2010 at 12:02 pm
very very cool 😀
but this will not get you laid 😦
john585 said this on January 13, 2010 at 12:18 pm
Incredible. And the MLCad software seems really nice to make instruction manuals, I’ll have to take a look at that.
IceBrain said this on January 13, 2010 at 12:45 pm
Hi! Do you know about lego-like brick kits aimed at gadget case building? I can see your router case has some really thin bricks, but I don’t see any bricks with blunt, rounded edges (I like that bricky case, but I’d like to make a case with a more ‘organic’ looking shape)
kobe said this on January 13, 2010 at 1:16 pm
RE: kobe
There are a number of bricks you could use if you wanted more curves or rounded edges, I just preferred the more square look on my models. Here are some examples:
http://www.bricklink.com/catalogItem.asp?P=2577
http://www.bricklink.com/catalogItem.asp?P=3063
http://www.bricklink.com/catalogItem.asp?P=6081
http://www.bricklink.com/catalogItem.asp?P=6191
http://www.bricklink.com/catalogItem.asp?P=6192
Good luck!
Luke
Luke said this on January 13, 2010 at 3:36 pm
Ok, sorry the extra post: I’ll do some research on Brickstore and MCAD: I had no idea how sophisticated this lego thing has gone, it’s all so uber geekish!
kobe said this on January 13, 2010 at 2:52 pm
very very cool man 😀
Manol said this on January 13, 2010 at 6:26 pm
[…] que o “artista” Luke fez foi montar um roteador WRT54GL da Linksys em uma estrutura totalmente feita com LEGO. Veja a […]
Roteador de LEGO | Guanabara.INFO said this on January 13, 2010 at 11:01 pm
That is just COOLER than COOLER! You rock!
Sean Kearney said this on January 13, 2010 at 11:23 pm
[…] met een videootje over hoe je zo’n ding in elkaar dient te zetten. En als je nu eenmaal een Router van Lego hebt, hoort daar natuurlijk ook een PC bij… Zou er ook een printer te vinden zijn ? Een monitor […]
Lego router | Niet nuttig, of wel? said this on January 14, 2010 at 4:50 am
[…] les routeurs Linksys WRT54GL et pour une configuration Mini-ITX. Les plans pour le PC et pour le Routeur. Lego, Linksys, Luke, Mini-ITX, Via […]
Un routeur et un ordinateur en briques Lego -/- I'm not Geek (point com) = Awesome said this on January 14, 2010 at 8:04 am
[…] router can be found here to buy on Amazon and the instructions here. More details can be found on Luke’s site that go over the build in more […]
Linksys WRT54GL Lego Router said this on January 14, 2010 at 9:22 am
[…] a redesign?) Linksys router and giving it a shiny new coat of Lego paint seems like a great idea. Some guy named Luke did it, and the results are pretty […]
Lego Linksys Router Upgrade said this on January 14, 2010 at 1:56 pm
[…] Link [via] […]
GEARFUSE » DIY LEGO Internet Router said this on January 14, 2010 at 3:52 pm
[…] Luke Anderson took apart his Linksys WRT54G router, and fitted the parts into his lego casing, and everything fits so perfectly! He even documented the steps he took for his cool DIY project on his blog. […]
alafista.com - A Fusion of Japan's Otaku and Popular Culture said this on January 14, 2010 at 4:21 pm
[…] mid-afternoon drink. Well now you can be proud of your creation thanks to Luke Anderson and his Lego Router. Handling that manufactured router can be a pain, so why not build one made from perfectly measure […]
Legos: Everyones Favorite Router | Still looking for Carmen Sandiego's Blog said this on January 14, 2010 at 9:25 pm
[…] que o “artista” Luke fez foi montar um roteador WRT54GL da Linksys em uma estrutura totalmente feita com LEGO. Veja a […]
Roteador de LEGO « InfMatica seu blog de informação said this on January 15, 2010 at 6:49 am
[…] technology just became a lot more geeky with Luke Anderson’s rather cool DIY Lego router. His router design is based upon the Linksys WRT54GL router and when […]
DIY Lego Router said this on January 15, 2010 at 11:52 am
[…] que o “artista” Luke fez foi montar um roteador WRT54GL da Linksys em uma estrutura totalmente feita com LEGO. Veja a […]
Roteador de LEGO « said this on January 15, 2010 at 12:10 pm
[…] gevolgd door drie foto's van het eindresultaat. Voor meer afbeeldingen en informatie, bezoek de weblog van […]
Plaats hier hardware gerelateerd nieuws! - Page 22 said this on January 16, 2010 at 11:11 am
Excellent high tech look! I hadn’t thought much about ventilation and your design gets some nice airflow. Thanks for the detailed plans.
Del DeVries said this on January 17, 2010 at 7:35 am
[…] WRT54GL's PCB in an entirely Lego-built enclosure. He was also kind enough to provide downloadable instructions on his blog. Anyone out there been using Lego for their DIY electronics projects? [via Byphenyl's Twitter […]
Lego router works! | Products & Tech News said this on January 17, 2010 at 8:17 am
[…] Luke Anderson se ha currado este router Linksys WRT54GL tuneado a base de LEGOs. En su web explica todos los pasos (igual te inspira algún trabajito parecido: el router de Linksys es de los más hackeables), y el […]
Router en LEGOs | despuesdegoogle said this on January 17, 2010 at 8:29 am
Incredible, very very good
Bruno Rodrigues said this on January 17, 2010 at 9:44 am
[…] pibe Luke Anderson en su web explica como realizar esta espectacular carcasa para el router Linksys […]
Lego Router Linksys WRT54GL | Curiosidades | Plencovich Blog said this on January 17, 2010 at 11:01 am
[…] still a great job, and one that’ll look real good in your living room. The best part is, instructions have been provided for you, so if you think you want to do this over the weekend, give it a […]
Lego Router Offers You Wi-Fi « Gadgets Club said this on January 17, 2010 at 11:26 am
[…] still a great job, and one that’ll look real good in your living room. The best part is, instructions have been provided for you, so whether you think you want to do that by the weekend, give it a […]
Lego Router Offers You Wi-Fi | Gadgets 411 said this on January 17, 2010 at 11:50 am
[…] still a great job, and one that’ll look real good in your living room. The best part is, instructions have been provided for you, so if you think you want to do this over the weekend, give it a […]
Lego Router Offers You Wi-Fi | Products & Tech News said this on January 17, 2010 at 12:27 pm
Thumbs up!
Benny Neugebauer said this on January 17, 2010 at 5:01 pm
nice!
flashdrive said this on January 17, 2010 at 5:28 pm
wow, that was really cool!
Web Design Philippines said this on January 18, 2010 at 12:34 am
very nice, good job.. I wish I had that many black pieces! 😀 😉
however, LEGO is NOT designed in metric units (mm) the brick units are all made using IMPERIAL (inches) divisions. Once you realise that, the ratios between brick/plate widths and heights falls into place much better. Everything is measured in 16ths. 1 brick “unit” = 5x5x6 16ths, stud height = 1 16th. therefore plate height is exactly 2 16ths. it becomes so much easier to calculate real sizes using this rather than mm. Good luck!
Naughty Nathan said this on January 18, 2010 at 4:45 am
Amazing job.
perfector said this on January 18, 2010 at 5:18 am
[…] você ficou tenso e quer fazer igual, é só seguir as dicas do Luke. Videos Legais | diy, lego, nerd, nerd como a gente, roteador, […]
CDVagabundo - Roteador wi-fi de Lego! said this on January 18, 2010 at 7:31 am
[…] que o “artista” Luke fez foi montar um roteador WRT54GL da Linksys em uma estrutura totalmente feita com LEGO. Veja a […]
Se vira fui! said this on January 18, 2010 at 12:10 pm
[…] Router (via Slippery Brick), Router Blog Post, Mike’s LEGO CAD, LEGO Digital […]
Totally Cool Tech » Blog Archive » TCT Podcast Episode #432 – Super Colossal Mega Packed Show said this on January 18, 2010 at 1:52 pm
[…] | Luke’s Router | Email this | Comments Go to […]
DIY Lego router the perfect compliment to your Bristle Blocks firewall | Reaction Radio said this on January 18, 2010 at 2:08 pm
[…] 18 Jan 2010 14:02:00 EST. Please see our terms for use of feeds.Permalink Make | Luke's Router | Email this | Comments Filed under: Engadget Leave a comment Comments […]
DIY Lego router the perfect compliment to your Bristle Blocks firewall « CJS GadgetBag said this on January 18, 2010 at 2:09 pm
[…] | Luke’s Router | Email this | Comments Rate this topic: (No Ratings Yet) Popularity: 0 […]
RSS For Gadgets » DIY Lego router the perfect compliment to your Bristle Blocks firewall said this on January 18, 2010 at 2:26 pm
[…] | Luke’s Router | Email […]
DIY Lego router the perfect compliment to your Bristle Blocks firewall « May I Say! - Say what you want and where you want! said this on January 18, 2010 at 2:28 pm
[…] | Luke’s Router | Email this | Comments ArrayArrayArrayArrayArrayArray Link To This Post1. […]
DIY Lego router the perfect compliment to your Bristle Blocks firewall » News, Specs, Reviews, Features, Price said this on January 18, 2010 at 2:35 pm
[…] | Luke’s Router | Email this | Comments Filed under Engadget Tags: 3d scanner, anything, […]
DIY Lego router the perfect compliment to your Bristle Blocks firewall | TechBlogs Today said this on January 18, 2010 at 2:42 pm
Awesome! Really cool.
Anonymous said this on January 18, 2010 at 3:00 pm
[…] 18 Jan 2010 14:02:00 EST. Please see our terms for use of feeds.Permalink Make | Luke's Router | Email this | Comments Tags: diy, lego, lego router, LegoRouter, linksys, […]
DIY Lego router the perfect compliment to your Bristle Blocks firewall | Technology South Africa said this on January 18, 2010 at 4:05 pm
[…] | Luke’s Router | Email […]
DIY Lego router the perfect compliment to your Bristle Blocks firewall said this on January 18, 2010 at 6:04 pm
[…] | Luke’s Router | Email […]
Jeff’s Home » Blog Archive » DIY Lego router the perfect compliment to your Bristle Blocks firewall said this on January 18, 2010 at 6:42 pm
[…] | Luke’s Router | Email […]
BlogLime » Blog Archive » DIY Lego router the perfect compliment to your Bristle Blocks firewall said this on January 18, 2010 at 6:54 pm
[…] PCB in an entirely Lego-built enclosure. He was also kind enough to provide downloadable instructions on his blog. Anyone out there been using Lego for their DIY electronics projects? [via Byphenyl's Twitter […]
Ultimate Lego Gadget: Lego Router Actually Functions said this on January 19, 2010 at 12:45 am
[…] | Luke’s Router | Email […]
Funny Gadget Gifts | DIY Lego router the perfect compliment to your Bristle Blocks firewall said this on January 19, 2010 at 1:00 am
That is quite possibly the coolest thing I have ever seen in my entire life … I can see some Lego projects in my future …
Liam said this on January 19, 2010 at 4:05 am
[…] lego diy router brought to you by Luke, not Skywalker but a cool person! check it out: Luke’s blog […]
DIY Lego Router: « enveus said this on January 19, 2010 at 3:41 pm
[…] how Luke Anderson converted his Linksys wireless router into a Lego router. If you would like to build one yourself, […]
DIY: Lego Router said this on January 20, 2010 at 8:55 am
[…] fbShare = {url: 'http://guydoyen.fr/2010/01/21/un-routeur-en-lego/', title: 'Un routeur en LEGO'} Luke Anderson a créé un routeur tout en LEGO à partir de son routeur Linksys. Si vous voulez en construire un, […]
Un routeur en LEGO @ Guy DOYEN said this on January 20, 2010 at 6:27 pm
[…] your favorite toy! Ready to dive in? We thought so… hit the source link to get started. Source: Luke's Router […]
DIY Lego router the perfect compliment to your Bristle Blocks firewall | Technology Magazine News said this on January 22, 2010 at 7:19 am
[…] [Via] Von Tim Steiner | 22.01.10 | Computer, Software & Büro, Discovery | Permalink Trackback Adresse für diesen Eintrag: http://www.smartshoppingblog.de/8518_lego-alles-kann-lanrouter/trackback/ […]
Was Lego alles kann: LAN-Router | SmartShopping.de Blog said this on January 22, 2010 at 8:21 am
[…] Web Oficial: Luke Anderson […]
Router de Lego | Lynxstyle Informa said this on January 22, 2010 at 10:00 am
[…] “Lego router” (via Sean) – A guy built a case for Linksys router out of Lego. He also built a computer case in a similar way. It all is probably useless, but really cool. […]
Digest #22 : ::: Think Macro ::: said this on January 25, 2010 at 10:56 am
[…] | Luke’s Router &nbsp;|&nbsp;Email […]
DIY Lego router the perfect compliment to your Bristle Blocks firewall | DirectoryUtopia.Com said this on January 26, 2010 at 5:52 pm
[…] still a great job, and one that’ll look real good in your living room. The best part is, instructions have been provided for you, so if you think you want to do this over the weekend, give it a […]
Lego Router Offers You Wi-Fi | Hitech Zone said this on January 26, 2010 at 9:02 pm
I’ve been working on this and it is perfect!
I had to make some addition as I think some was not so perfect.
As with the tiles on the top, it is not very strong, especially when you have cats walking around on services.
I had to order some 12×2 black flat bricks to put underneath the weak points.
Now it is perfect!!!
Tristan said this on February 2, 2010 at 5:03 pm
Glad to hear you were successful! Would love to see pictures.
Indeed, the top surface was not designed to be strong. It was a compromise to help dissipate heat by keeping only the thinnest layer of plastic on top, but is admittedly very weak.
Thanks for visiting!
Luke
Luke said this on February 2, 2010 at 5:16 pm
[…] Lego Router (WRT54GL) […]
Linki zadnjega meseca .. | Kiberpipa.net said this on February 18, 2010 at 4:04 pm
[…] enclosure for it out of legos. He has a guide on his blog on how to build this beefy man machine. (link) Check out the clear legos to maintain functionality of the LED indicator lights. […]
lemonade republic — lego router said this on March 9, 2010 at 5:50 am
I love that one!!!
Hamza said this on March 11, 2010 at 8:02 am
[…] Lego Router (WRT54GL) « Luke's Weblog […]
Lego Computer said this on April 5, 2010 at 1:26 am
[…] related items. First a Linksys wireless router that was re-housed in a box made from LEGO® by Luke. The result is very […]
LEGO Radio « VA3STL's Weblog said this on April 12, 2010 at 9:47 pm
[…] https://tfvlrue.wordpress.com/2010/01/08/lego-router-wrt54gl/ […]
LEGO Router and CPU « Thoughts of Schamael said this on April 15, 2010 at 3:57 pm
[…] this clip as Luke Anderson converted his Linksys router into a […]
Lego Router Design said this on April 16, 2010 at 4:07 pm
The PCB for the WRT54GL is an “L” shape, which presented an interesting challenge. The small side of the ”L” is just shy of 61mm, which is 3mm short of being a multiple of 8mm. Initially, I thought I would have to leave a big gap, or just design a square inset.
Katie Tam said this on May 4, 2010 at 1:35 pm
cool!i would like to put on my website!!!!!it would make good news!!!!!!!
austin said this on May 5, 2010 at 3:25 pm
The lego comp case inspired me to make my own based on a mac g5 case complete with curved handles top and bottom using some creative SNOT. Designed in MLCAD just waiting on shipments of bricks. Now you go ahead and spring the router on me! well looks like ill have to encase my keyboard…Keep up the good work.
Alex said this on May 5, 2010 at 11:13 pm
[…] (image credits: tfvlrue) […]
Combine Technology with Lego Creations, Pure Geeky Genious - DeviceMAG said this on May 18, 2010 at 10:03 am
[…] Luke put his geeky creativity to work again and came up with a fully functioning Lego router. It has two air vents, a row of clear bricks for the LEDs to shine though, and an opening for ports in the back. It also matches the Lego computer that he built. A boring Linksys WRT54GL router turned into a Lego router, that’s geeky greatness right there. [Link] […]
Lego + Technology – There’s Nothing Lego Lovers Can’t Achieve… « This is our site said this on May 19, 2010 at 6:04 am
[…] qui lui permettent de fonctionner parfaitement. Luke Anderson, son créateur, propose même un mode d’emploi très détaillé pour qui voudrait réaliser un objet similaire. N’empêche, quelle patience […]
Un routeur en Lego… qui fonctionne ! said this on June 13, 2010 at 11:45 am
[…] qui lui permettent de fonctionner parfaitement. Luke Anderson, son créateur, propose même un mode d’emploi très détaillé pour qui voudrait réaliser un objet similaire. N’empêche, quelle patience […]
Un routeur en Lego… qui fonctionne ! « Tech me, le blog said this on June 13, 2010 at 2:57 pm
This is awsome concept and Idea. Can’t wait to give it try. Really i would have never thought to use legos to house a router or computer. guess it worked out better than my friend “aquaium case”
jdengelke said this on June 24, 2010 at 3:41 am
Ciao that text is cool are you a professional author ? Maybe i can pay you to post for my blog?
Artitouri said this on June 30, 2010 at 8:05 am
Son, you need to get out more.
Lineswine said this on July 4, 2010 at 8:18 pm
This is really amazing! Building a computer case out of Leggos? Who would have thunk it..LOL. Brilliant, I love it! http://www.thermaltakearmor.com Thanks for sharing.
Thermaltake Armor said this on July 31, 2010 at 6:20 pm
Hello!
I like this blog. It is very nice to read.
I am curious why I didn’t know about this blog before.
Sharing is a virtue, and more people need to see this blogpost.
I will surely spread the word. Many of my friends will love it.
Cheers and keep it up!
=)
funny stuff said this on September 7, 2010 at 4:14 pm
awesome stuff friend! To integrate real tech and build a case with lego. Going to start a project myself. Where do you buy your Lego, I’m from Holland an buy Lego here
FreekW said this on September 17, 2010 at 3:56 am
You should read the manual.
Everything you need is in there, also where to buy Lego
Brinkman said this on September 17, 2010 at 4:00 am
I think it looks much nicer than the original housing.
Peter said this on October 5, 2010 at 12:37 pm
[…] you wish to build a Lego router like that, Luke has also provided the blueprint for download on his weblog for your […]
Linksys Router Casing Made of Lego Bricks said this on October 10, 2010 at 7:06 am
[…] e Quo le info del progetto dal realizzatore dei video. Creatività, Hardware case (7), […]
Lego Computer & Router | Lega Nerd said this on November 22, 2010 at 5:16 am
[…] Le blog de luke Share and Enjoy: […]
Routeur Lego | mart-e said this on January 9, 2011 at 4:47 pm
[…] Also check out my new Lego router!https://tfvlrue.wordpress.com/2010/01/… […]
Lego Computer said this on February 27, 2011 at 8:13 am
[…] how Luke Anderson converted his Linksys wireless router into a Lego router. If you would like to build one yourself, […]
DIY: Lego Router | Best Web Gallery - Flash Gallery - CSS Gallery - Web Design Inspiration - CSS Web Gallery - Designing Gallery said this on April 29, 2011 at 3:15 am
Leominster@gmail.com
Hell yes, i want write something same this except didnt bring forth season, may i repost this Lego Router (WRT54GL) « Luke’s Weblog said this on July 1, 2011 at 5:13 pm
Fantastic, I have this exact lynksis at home (awesome router) but I wouldn’t mind the Lego one as well … although I probably wouldn’t know how to build it. 🙂
Android tablet comparison said this on July 17, 2011 at 12:27 pm
Very nice, good job!
Groupon said this on August 2, 2011 at 8:21 am
This is amazing and instructive for all off as, thanks and good sharing….
tom_m said this on October 17, 2011 at 3:39 pm
[…] Lego is always fun for all the family regardless of age and if you have a bit of free time on your hands maybe you could try making your very own Lego working router. Check the link here. […]
INDOOR ENTERTAINMENT | PurelyGadgets said this on November 24, 2011 at 4:43 am
Thanks for the helpful post, I hope the market depending on the power supply that the electronic requires so while you dont get upset if I take some of the information for my website. Thanks!
laaurenbacall said this on December 9, 2011 at 6:36 am
This looks amazing! Can I buy this somewhere?
Lego korting said this on February 9, 2012 at 2:09 pm
this looks very cool…
Korting said this on March 7, 2012 at 4:25 pm
Wow. looks great!
Legostyle said this on January 2, 2013 at 8:20 am
[…] is a product that people did some amazing stuff with – like building a LEGO version or even a […]
Happy Birthday to the Linksys WRT54G « OzCableguy said this on June 3, 2014 at 6:37 pm
techsite
Lego Router (WRT54GL) | Luke’s Weblog
techsite said this on July 25, 2017 at 2:40 pm
[…] Lego Router (WRT54GL) […]
Fibs Gambit Asscher – 82% said this on January 15, 2021 at 3:18 am